How to Make a Stencil with Cricut: A Comprehensive Guide
Making a stencil on your Cricut machine is one of the easiest projects. You can make stencils for any surface, like room walls, wood, canvas, fabrics, and more. To complete the project, simply choose your desired material and get the design cut on the machine. To create a stencil, you must know how to make a stencil with Cricut. If you don't know it already, read this blog till the end to learn how.
In this post, I will also explain the
necessary materials you will need for your project. Then, I will guide you
through creating stencils with the Cricut machine.
Tools and Supplies for Creating Cricut Stencil
Before learning how to make a stencil with Cricut, you should know about the things
you will need for your project. Here are all the supplies you need to get
started:
●
Cricut machine: You need a machine to make
stencils. This machine will cut the design that you choose on the Cricut Design
Space app. You can use Cricut machines like Maker 3, Explore 3, or Joy. These
are the latest and best machines for your projects, but other models can also
work.
●
A surface for stencil: To make any stencil,
you need a surface. Stencils can be applied to different surfaces such as
fabric, walls, wood, canvas, etc. Ensure the surface works well with the paint
or stain you will be using.
●
Vinyl: You can use any regular or
self-adhesive vinyl. In case you want a reusable stencil, it is best to use a
specific type of vinyl made for that purpose.
●
Cricut cutting mat: A mat is essential for
making stencils on a Cricut machine. But, if you use smart materials, you might
not need the mat.
●
Weeding tool: This is crucial for peeling off
unwanted remnants of the material from the design after cutting.
●
A scraper tool: When using vinyl, a scraper
tool ensures there are no lumps when transferring the stencil.
●
Paint or pens: The tool you use for painting
will depend on the material of your stencil. For example, paint works best for
wood, while Cricut pens are better for cardstock or similar materials.
●
Transfer tape: To transfer the project onto
the surface, you'll need transfer tape. When using vinyl, it's best to use
transfer tape. For craft plastic, masking tape can be used instead.
By collecting all these materials, you will be
prepared to start creating stunning stencils with your Cricut machine.
How to Make a Stencil with Cricut: 5 Easy Steps
When you have all the required items ready,
set up your Cricut and get started with the project. Here are five simple steps
to make a stencil:
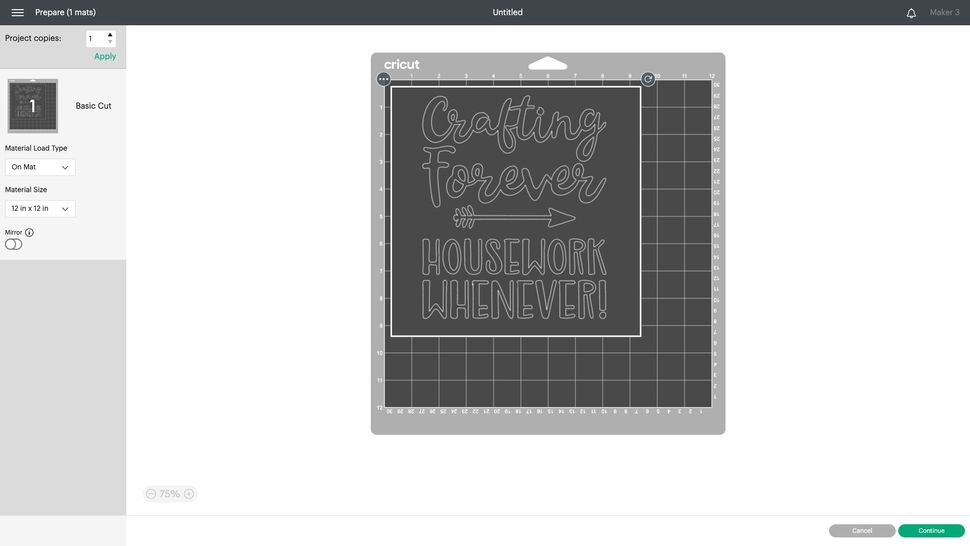
Step 1: Create a Design in Cricut Software

The first thing you need to do is create your
design. Open the Cricut Design Space app and then start by opening a new
canvas. Next, place any design you want on the canvas, which can be created
from scratch or selected from the app's library. Also, you can edit and
customize the design to your liking, adjusting shapes, text, and other elements
as required. Once your design is ready, move on to the next step. This is how
the design will look once you create it in the Cricut software.
Step 2: Start the Cutting Process

Once your design is ready, it is time to cut
it using your Cricut machine. After that, place the material on the cutting
mat, ensuring it's secure. Now, insert the mat into the machine and press the Load button. Then, follow the basic
steps to begin the cutting procedure. Once the machine has finished cutting,
you will need to unload the mat. Finally, the material will be cut according to
your design.
Step 3: Weed Out and Apply the Transfer Tape
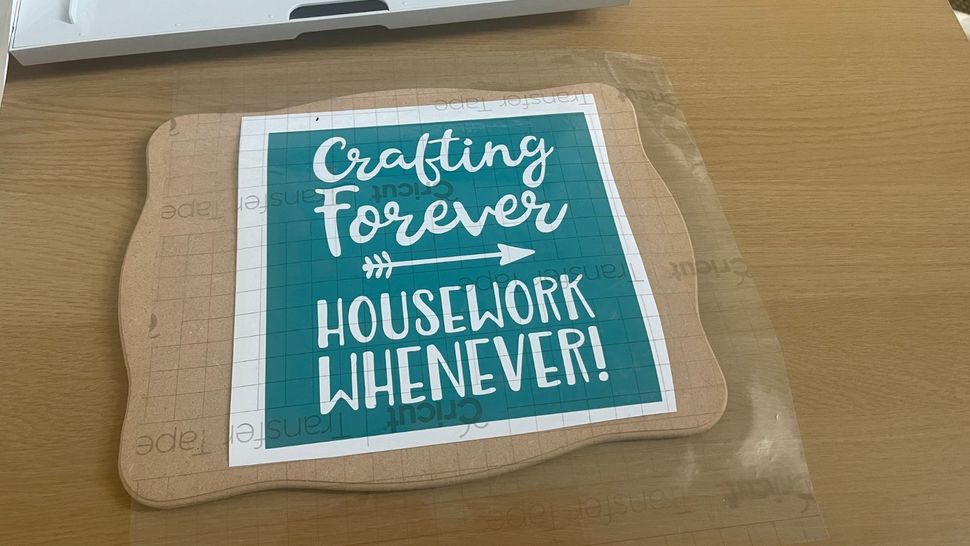

After cutting the design on your machine, use
a weeding tool to remove all unwanted parts of the material, leaving only your
desired stencil design. Next, apply transfer tape over the weeded design to
help transfer it to your surface. This step ensures the stencil stays intact
and is easily applied to your project.
Step 4: Begin Painting Your Design
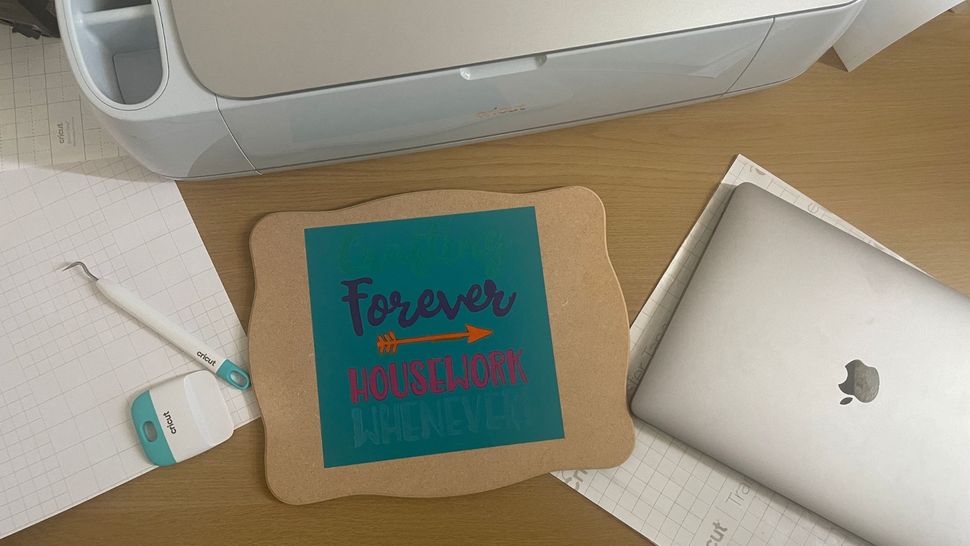

After weeding, place the stencil on your
desired surface and then secure it with transfer tape to ensure stability. Now,
you can apply paint to the design. Also, you can use a single color for a
uniform look or multiple colors to add complexity and detail to different parts
of the design.
Step 5: Reveal Your Stencil
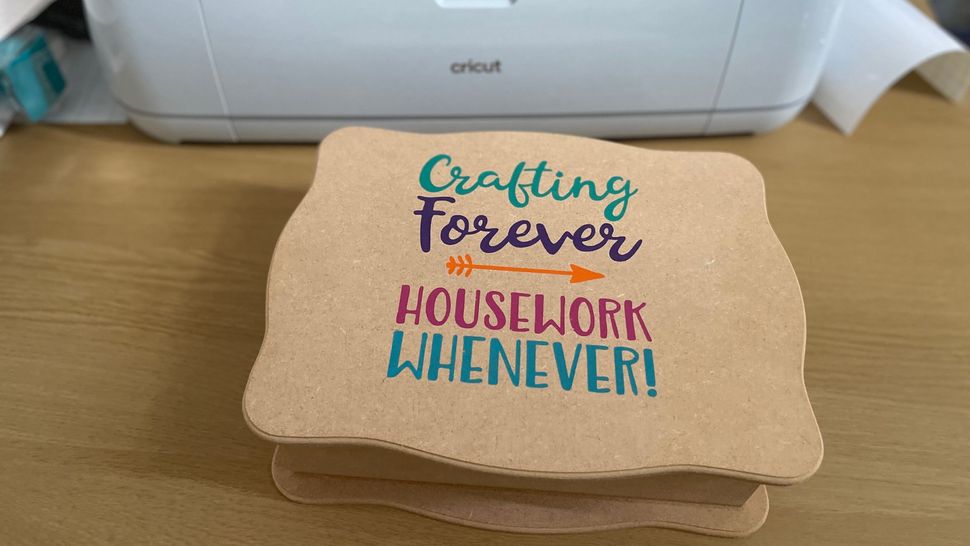

Finally, carefully remove the stencil material
from the surface, ensuring the paint has dried properly. Your stencil project
is now complete, showing your beautifully crafted design.
Conclusion
To conclude, learning how to make a stencil with Cricut is very easy. After reading this
write-up, you can see that it only requires the right supplies and following
five simple instructions. I have explained each and every step clearly so you
can create stencil projects on any surface and get professional results. Start
making your unique projects with Cricut machines today.
FAQs
What is a
stencil?
A stencil is basically a cut-out design on
materials like paper, plastic, or vinyl. To use a stencil, you place it on a
surface and then apply paint over it. After that, phi paint goes through the
design and transfers onto the surface. Stencils are versatile, allowing you to
make a variety of projects, such as wood signs, wallpaper, painted floors,
fabric designs, and more.
What Are the Things Needed for Cricut Stencil?
To create stencils with Cricut, you will need
specific materials:
●
Cricut cutting machine
●
Vinyl
●
cutting mat
●
Scraping and weeding tools
●
Stain, paint, or pens
●
Transfer tape
What Material Should I Use for Stencils?
You can use various materials to make stencils
on your Cricut machine. One highly recommended material is mylar due to its
durability and great performance. Moreover, you can use materials like craft
plastic, wood, paper, vinyl, fabrics, and more to create stencils with your
machine.
Comments
Post a Comment